NPOS 신규 설치 admin_setting 가이드 (Tablet Ordering / QR Ordering)
 0
0
 0
0
개요
Overview
새로 설치한 POS 는 설정값이 모두 비어 있습니다. 태블릿 주문(NMENU)과 QR 주문(N-QR)은 둘 다 꺼진 상태로 시작합니다. 그래서 Super Admin Setting 에서 기능을 먼저 켜고, 그다음 일반 admin_setting 에서 매장에 맞게 세부 값을 채웁니다.
A newly installed POS starts with every setting empty, and both tablet ordering (NMENU) and QR ordering (N-QR) are off. Turn the feature on in Super Admin Setting first, then fill in the store’s details in the regular admin_setting.
| 매장 유형 | 손님이 주문하는 방법 | 켜야 할 기능 (Super Admin) | 세부 설정 메뉴 | 인터넷 |
|---|---|---|---|---|
| 태블릿 매장 | 테이블에 놓인 태블릿 또는 키오스크 | NMENU 사용유무 | NMENU 설정 | 매장 내부망(Wi-Fi)만 있으면 됨 |
| QR 매장 | 손님 휴대폰으로 테이블 QR 스캔 | N-QR + Online Ordering URL | QR, Online Ordering | 반드시 필요 |
| Store type | How guests order | Turn on (Super Admin) | Detail menu | Internet |
|---|---|---|---|---|
| Tablet store | Tablet on the table, or a kiosk | Use of Digital Ordering (NMENU) | Digital Menu | Store Wi-Fi (LAN) is enough |
| QR store | Guest scans the table QR with their phone | N-QR + Online Ordering URL | QR, Online Ordering | Required |
두 방식을 같이 쓰는 매장은 2장과 3장을 모두 진행합니다. 화면 위치는 모두 POS → 설정(admin_setting) 화면입니다. 왼쪽 메뉴 이름은 POS 언어 설정에 따라 영어로 보일 수 있습니다.
Stores using both follow sections 2 and 3. Every screen is under POS → Settings (admin_setting). Left-menu names may appear in English depending on the POS language.
1. 공통 준비 (모든 매장)
1. Common setup (all stores)
화면 메뉴는 영어로 나옵니다. 관리자설정 = Admin Settings, 매장정보 = Store Information, NPOS 설정 = NPOS Setting, NMENU 설정 = Digital Menu 입니다. 사진의 빨간 박스가 그 단계에서 만지는 곳입니다.
The screen menus appear in English: 관리자설정 = Admin Settings, 매장정보 = Store Information, NPOS 설정 = NPOS Setting, NMENU 설정 = Digital Menu. The red box in each photo is what you touch in that step.
1-1. Super Admin Setting 열기
1-1. Open Super Admin Setting
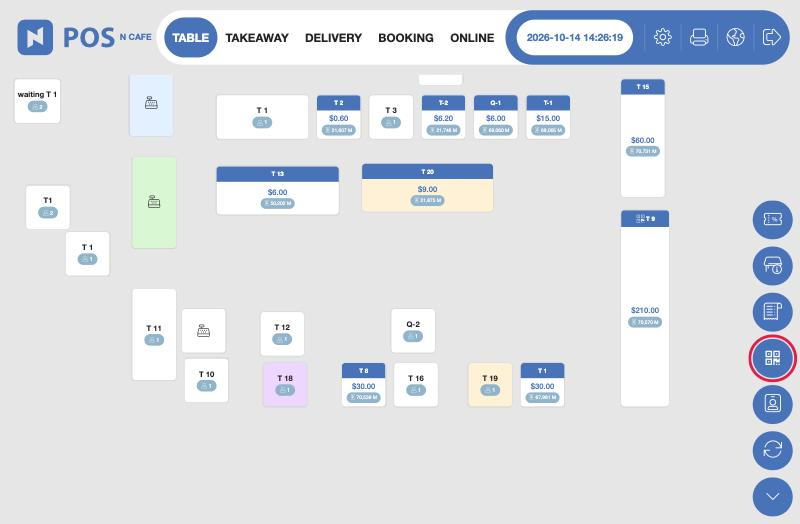
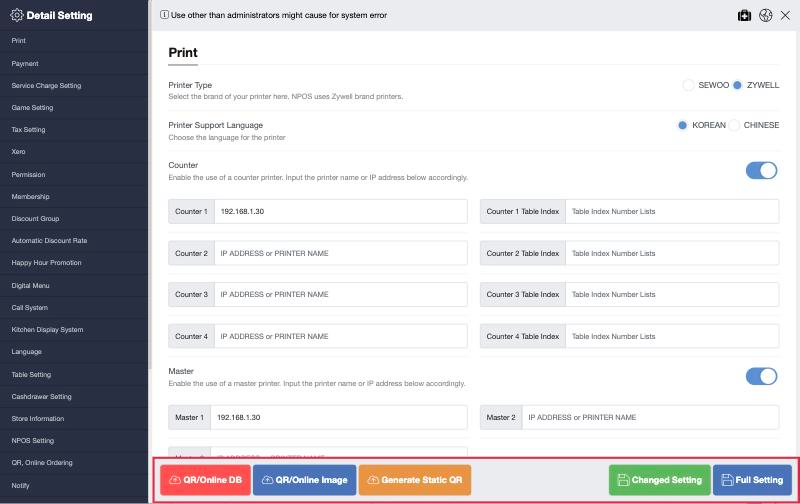
1단계. Super Admin 메뉴는 평소에 숨겨져 있습니다. 설정 화면 맨 아래 회색 버튼 줄의 빈 곳을 5번 이상 연속 클릭합니다. 버튼 자체가 아니라 버튼 사이 회색 바탕을 누릅니다.
Step 1. The Super Admin menu is hidden by default. Click the empty gray area of the bottom button bar 5+ times in a row — the gray background between the buttons, not the buttons themselves.
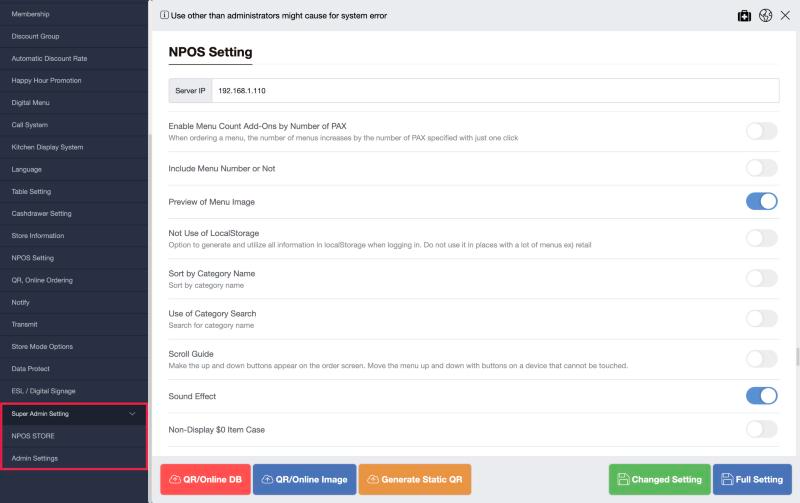
2단계. 왼쪽 메뉴 맨 아래에 Super Admin Setting 과 그 아래 NPOS STORE, Admin Settings 가 나타납니다. 새로고침하면 다시 숨겨지니 점주에게는 알려주지 마세요.
Step 2. Super Admin Setting appears at the bottom of the left menu, with NPOS STORE and Admin Settings under it. It hides again on refresh, so do not show store owners how to open it.
1-2. 매장 기본 정보
1-2. Store basics
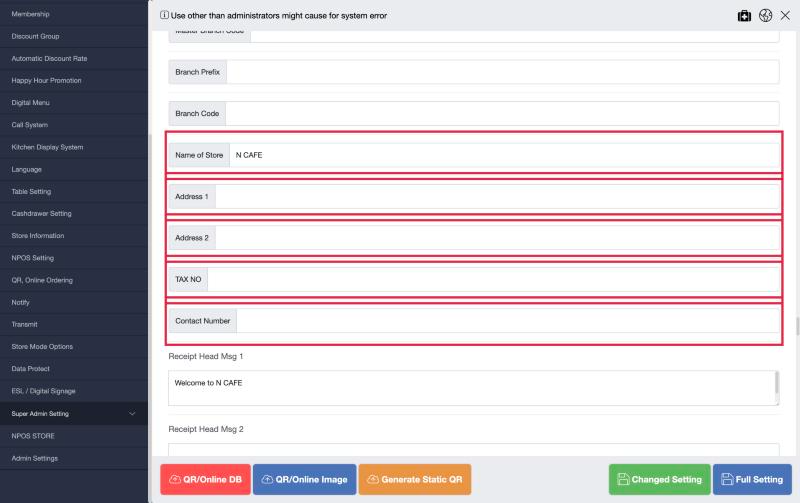
1단계. Store Information — Name of Store(상호), Address 1·2, TAX NO, Contact Number 를 넣습니다. 영수증에 그대로 찍힙니다. 영수증 상단·하단 메시지는 같은 화면 아래에 있고 선택입니다.
Step 1. Store Information — enter Name of Store, Address 1·2, TAX NO and Contact Number. They print on the receipt as entered. Receipt header and footer messages are further down the same screen and optional.
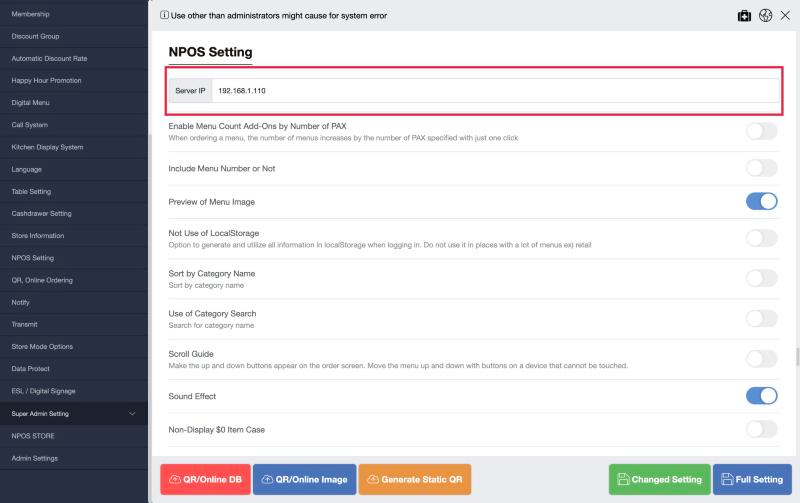
2단계. NPOS Setting → Server IP — 이 POS PC 의 내부 IP(예: 192.168.1.110)를 넣습니다. 태블릿·KDS 가 이 주소로 접속합니다.
Step 2. NPOS Setting → Server IP — enter this POS PC’s local IP (e.g. 192.168.1.110). Tablets and the KDS connect to this address.
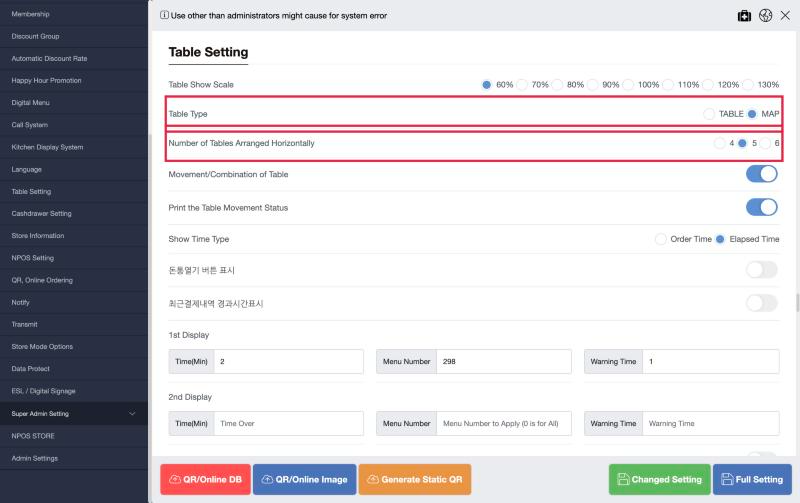
3단계. Table Setting — Table Type(TABLE 목록 / MAP 배치도)과 가로 개수를 매장 배치에 맞춥니다.
Step 3. Table Setting — set Table Type (TABLE list / MAP layout) and the number of tables per row to match the store layout.
4단계. Print(프린터), Payment(매장이 받는 결제수단), Language 도 매장에 맞게 맞춥니다.
Step 4. Also set Print (printers), Payment (payment methods the store accepts) and Language for the store.
1-3. 저장
1-3. Save
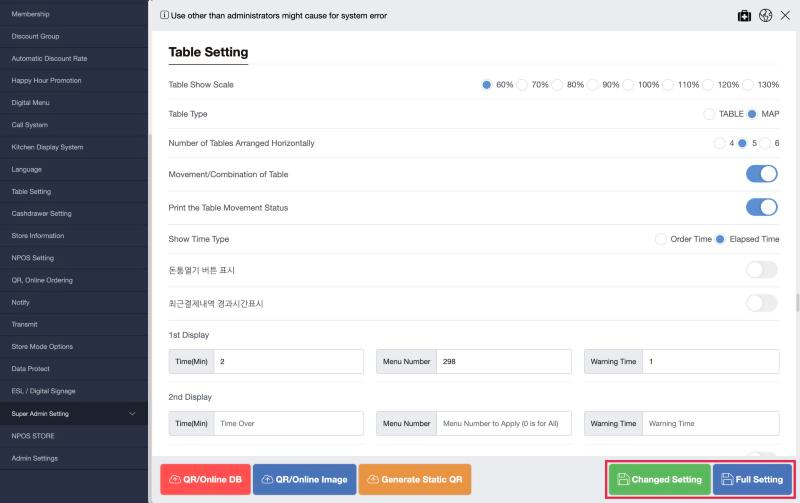
자동 저장은 되지 않습니다. 화면을 나가기 전에 오른쪽 아래 버튼으로 꼭 저장합니다.
There is no auto-save. Always save with the buttons at the bottom right before leaving the screen.
- Changed Setting(변경사항 저장): 바꾼 항목만 저장. 평소에 씁니다.
- Full Setting(전체설정 저장): 화면의 모든 값 저장. 신규 설치 마지막에 한 번 누르면 기본값까지 DB 에 남습니다.
- Changed Setting: saves only the items you changed. Use this normally.
- Full Setting: saves every value on the screen. Press it once at the end of a new installation so the defaults are stored in the DB too.
2. 태블릿 매장 가이드 (NMENU)
2. Tablet store guide (NMENU)
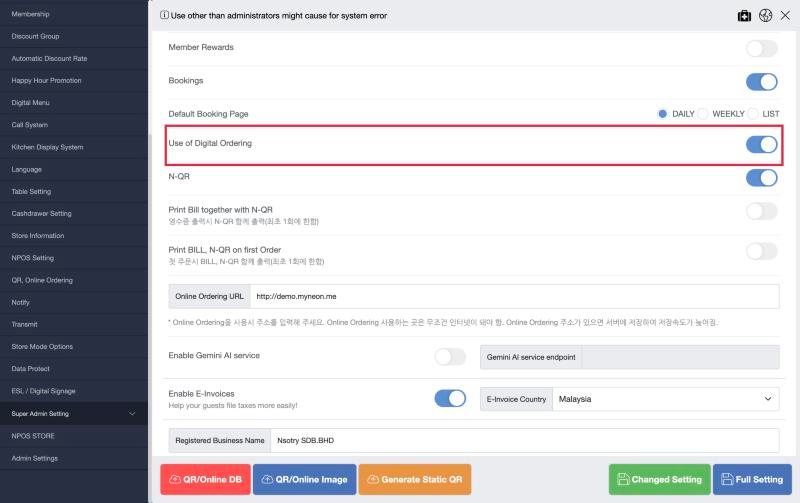
태블릿 주문은 Super Admin 에서 NMENU(Use of Digital Ordering)를 켜야만 열립니다. 꺼져 있으면 태블릿 화면에 “올바른 접근경로가 아닙니다” 가 뜨고 끝납니다.
Tablet ordering opens only after NMENU (Use of Digital Ordering) is turned on in Super Admin. If it is off, the tablet shows “invalid access path” and stops.
2-1. NMENU 켜기 (Super Admin)
2-1. Turn on NMENU (Super Admin)
1단계. 1-1 대로 Super Admin 을 열고 왼쪽 NPOS STORE 를 누릅니다. Use of Digital Ordering 을 ON 합니다.
Step 1. Open Super Admin as in 1-1 and click NPOS STORE on the left. Turn Use of Digital Ordering ON.
2단계. Changed Setting 으로 저장하고 설정 화면을 새로고침합니다.
Step 2. Save with Changed Setting and refresh the settings screen.
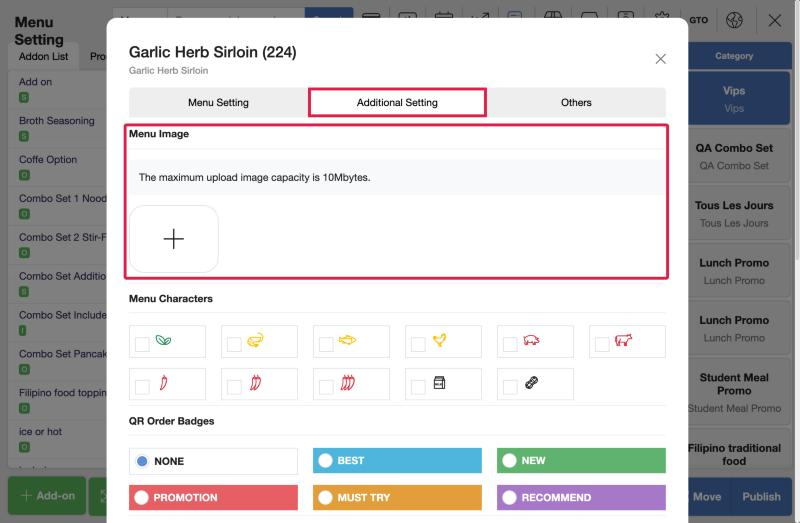
3단계. 메뉴 이미지 등록 — 태블릿에 보일 사진입니다. 메뉴 설정(Menu Setting) 화면에서 메뉴를 눌러 편집창을 열고, Additional Setting 탭의 Menu Image 에서 + 로 올립니다 (최대 10MB). 같은 창의 Menu Setting 탭에서 Hide → Digital/QR/Online Ordering 을 체크하면 태블릿·QR 에서만 숨길 수 있습니다.
Step 3. Upload menu images — these are the photos guests see on the tablet. In Menu Setting, click a menu item to open its edit window, then upload with + under Menu Image on the Additional Setting tab (max 10 MB). On the Menu Setting tab of the same window, Hide → Digital/QR/Online Ordering hides the item on tablet and QR only.
2-2. Digital Menu 설정 (테이블·키오스크 공통)
2-2. Digital Menu settings (table and kiosk)
왼쪽 메뉴 Digital Menu 에서 설정합니다.
Set these under Digital Menu in the left menu.
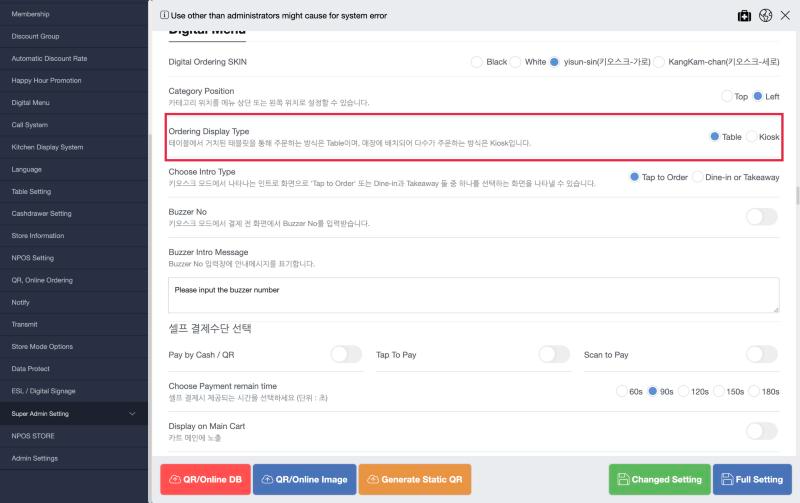
1단계. Ordering Display Type — 테이블에 거치하면 Table, 입구에 두고 여러 명이 쓰면 Kiosk. 아래 항목들이 이 값에 따라 달라집니다.
Step 1. Ordering Display Type — Table for tablets mounted on tables, Kiosk for one device at the entrance shared by many guests. The items below depend on this value.
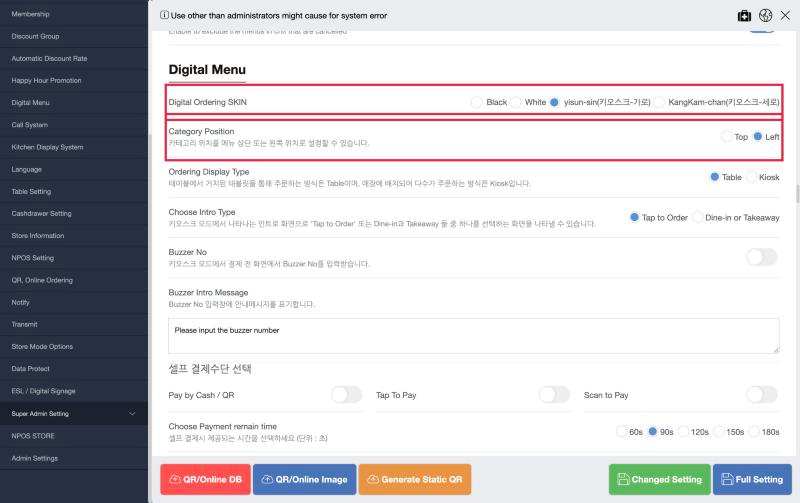
2단계. Digital Ordering SKIN, Category Position — 테이블은 Black/White 또는 yisun-sin, 키오스크는 화면 방향에 맞춰 yisun-sin(가로) / KangKam-chan(세로). 카테고리는 Top / Left.
Step 2. Digital Ordering SKIN, Category Position — for tables use Black/White or yisun-sin; for kiosks pick by screen orientation: yisun-sin (landscape) / KangKam-chan (portrait). Categories go Top or Left.
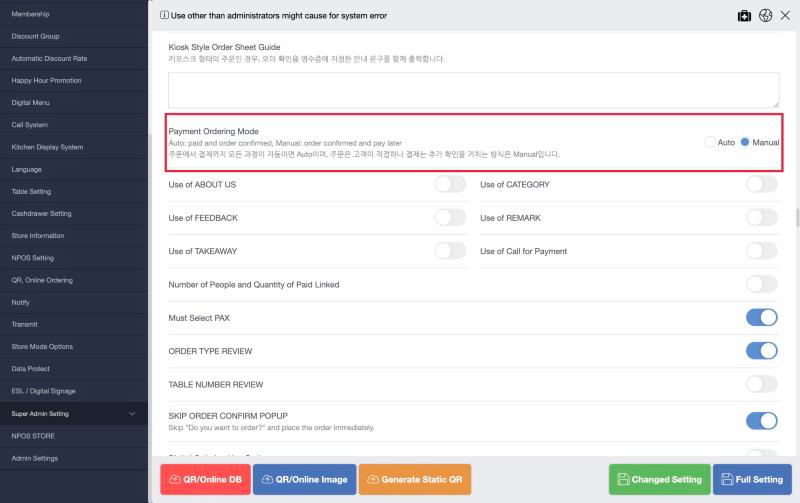
3단계. Payment Ordering Mode — 테이블은 보통 Manual(주문만 받고 결제는 카운터), 키오스크는 보통 Auto(주문과 결제를 한 번에).
Step 3. Payment Ordering Mode — tables usually use Manual (take the order, pay later at the counter); kiosks usually use Auto (order and pay in one go).
4단계. Must Select PAX — 무한리필·인원제 매장이면 ON. 주문 전에 인원을 꼭 받습니다. 키오스크는 OFF.
Step 4. Must Select PAX — ON for buffet or per-person pricing stores; guests must enter the number of people before ordering. OFF for kiosks.
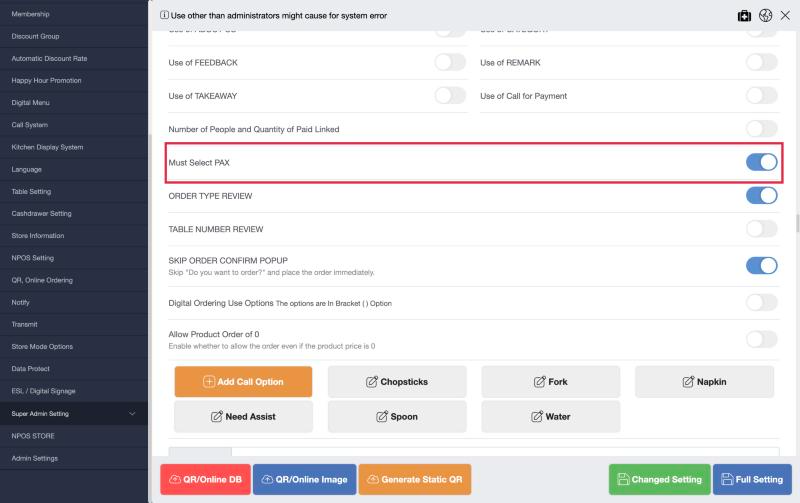
5단계. Add Call Option — 테이블 매장의 직원호출 항목(물, 수저, 냅킨 등)입니다. 버튼을 끌어 순서를 바꾸면 아래에 Update Call List Sort 가 나오니 눌러 저장합니다.
Step 5. Add Call Option — staff-call items for table stores (water, chopsticks, napkin, etc.). If you drag buttons to reorder them, an Update Call List Sort button appears at the bottom; press it to save.
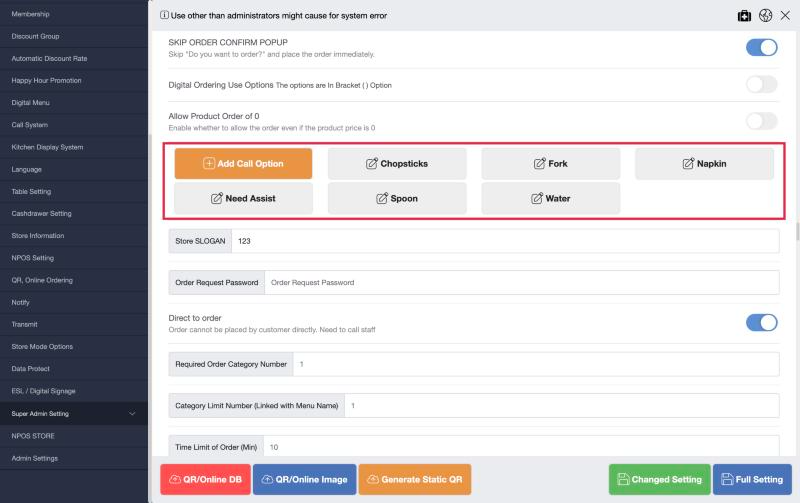
6단계. Order Request Password(주문접수 암호) — 테이블 모드는 필수입니다. 태블릿에서 테이블을 바꿀 때 묻는 암호라, 비어 있으면 손님이 테이블을 바꿀 수 있습니다.
Step 6. Order Request Password — required in Table mode. The tablet asks for it when changing tables; if it is empty, guests can change the table themselves.
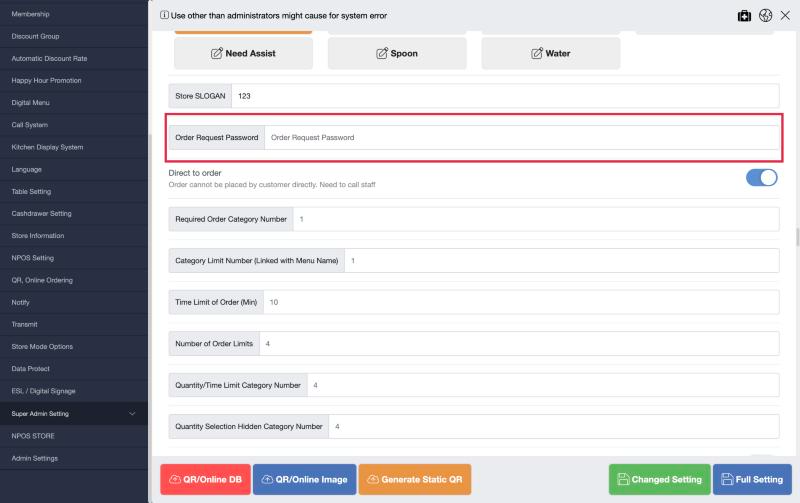
7단계. Direct to order — 화면 설명은 “직원을 불러야 주문된다” 지만 실제 동작은 반대입니다. ON 이면 손님이 바로 주문하고, OFF 이면 장바구니에 직원호출 버튼이 나옵니다. 보통 ON.
Step 7. Direct to order — the on-screen description says “need to call staff”, but it works the other way. ON lets guests order directly; OFF shows a call-staff button in the cart. Usually ON.
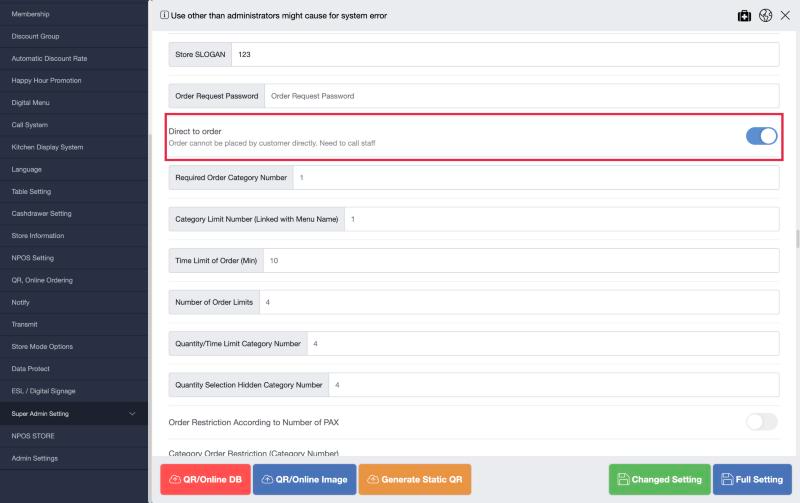
그 밖의 항목(Use of ABOUT US, FEEDBACK, REMARK, TAKEAWAY, 주문 제한 등)은 매장 요청이 있을 때만 켭니다. 무한리필 매장은 Table Setting 의 시간초과시 주문차단(NMENU/NEON/NQR) 도 설정합니다.
Turn on other items (Use of ABOUT US, FEEDBACK, REMARK, TAKEAWAY, order limits, etc.) only when the store asks. Buffet stores should also set block orders after time limit (NMENU/NEON/NQR) in Table Setting.
2-3. 키오스크만 설정하는 항목
2-3. Kiosk-only items
Ordering Display Type 이 Kiosk 일 때만 해당합니다. 테이블 매장은 건너뜁니다.
Only when Ordering Display Type is Kiosk. Table stores skip this part.
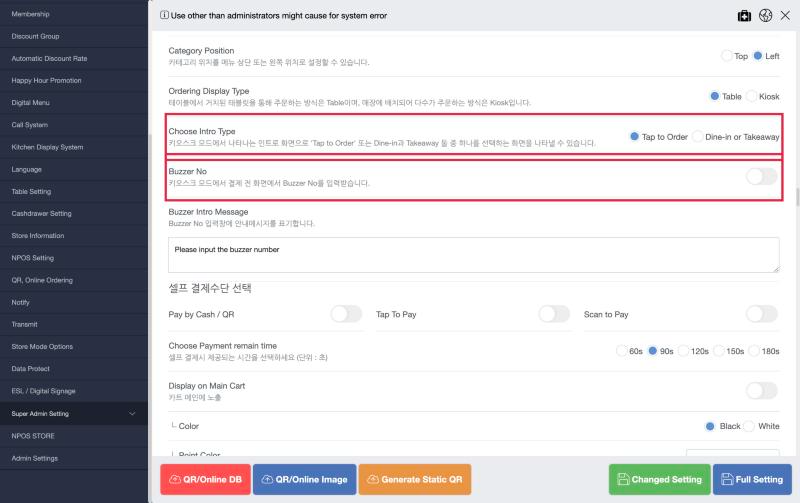
1단계. Choose Intro Type, Buzzer No — 첫 화면을 Tap to Order 또는 Dine-in/Takeaway 선택으로 정합니다. 진동벨을 쓰면 Buzzer No 를 ON 하고 안내 문구를 넣습니다.
Step 1. Choose Intro Type, Buzzer No — set the first screen to Tap to Order or a Dine-in/Takeaway choice. If the store uses pagers, turn Buzzer No ON and enter the guide message.
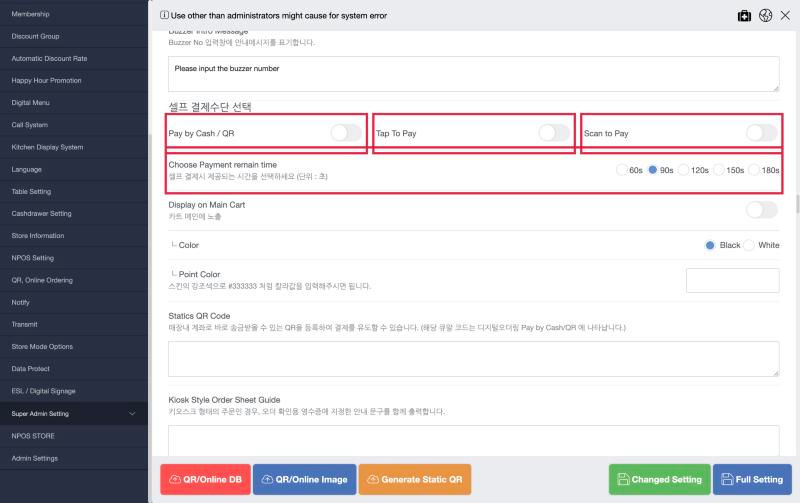
2단계. 셀프 결제수단, Choose Payment remain time — 키오스크가 받을 결제(Pay by Cash/QR, Tap To Pay, Scan to Pay)를 켜고, 결제 제한시간을 고릅니다.
Step 2. Self-payment methods, Choose Payment remain time — turn on the payments the kiosk accepts (Pay by Cash/QR, Tap To Pay, Scan to Pay) and pick the payment time limit.
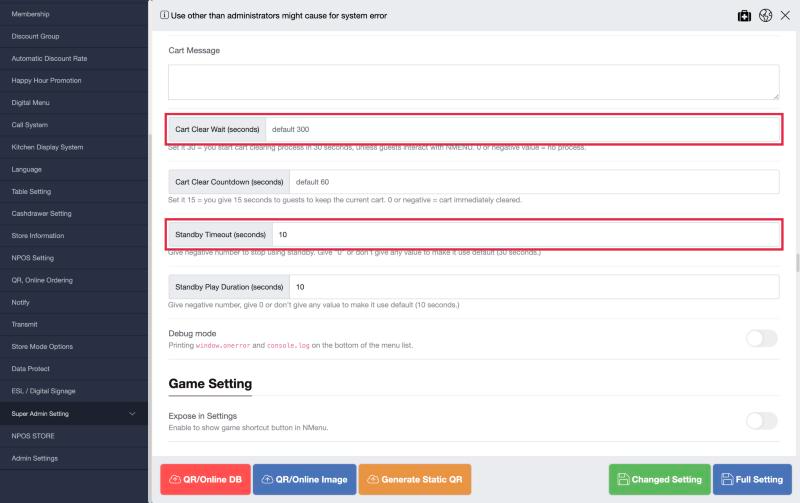
3단계. Cart Clear Wait, Standby Timeout — 손님이 떠난 뒤 장바구니를 비우고 대기화면으로 돌아가는 시간(초)입니다. 비워두면 기본값(장바구니 300초, 대기화면 30초)을 씁니다.
Step 3. Cart Clear Wait, Standby Timeout — seconds before the cart is cleared and the kiosk returns to standby after a guest leaves. Leave empty to use the defaults (cart 300 s, standby 30 s).
2-4. 태블릿 연결
2-4. Connecting the tablet
- 태블릿을 POS 와 같은 매장 Wi-Fi 에 연결합니다.
- 태블릿 브라우저에서
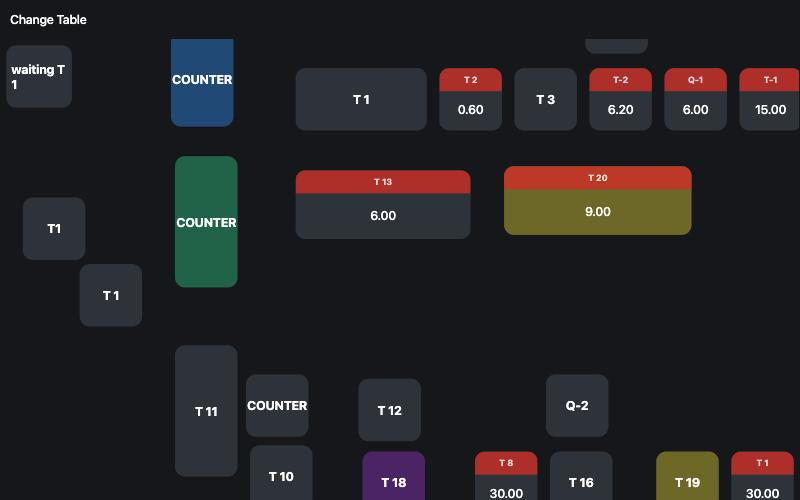
http://<서버 아이피>/nmenu/를 엽니다 (예:http://192.168.1.110/nmenu/). 첫 로딩에서 메뉴를 받아옵니다. - (Table 모드) 테이블이 아직 지정되지 않은 태블릿은 로딩이 끝나면 Change Table 화면(테이블 배치도)이 바로 뜨고 암호를 묻지 않습니다. 이 태블릿이 놓일 테이블을 누릅니다.
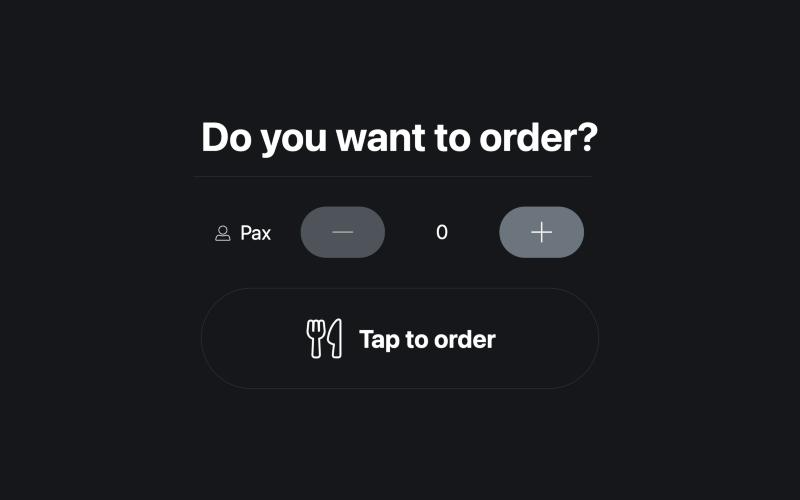
- “Do you want to order?” 화면이 나오면 테이블 지정이 끝났습니다. 다음부터 손님은 인원(Pax)을 고르고 Tap to order 로 들어갑니다.
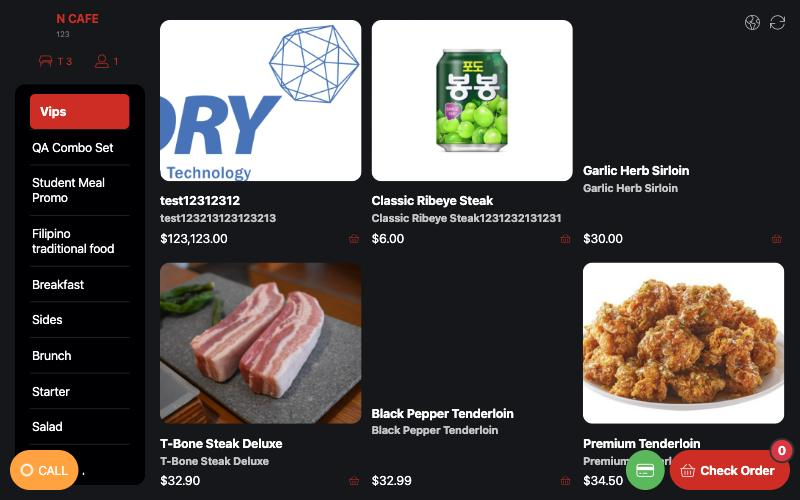
- 메뉴 화면 왼쪽 위에 매장 이름과 테이블 번호(예: T 3) 가 보이는지 확인합니다.
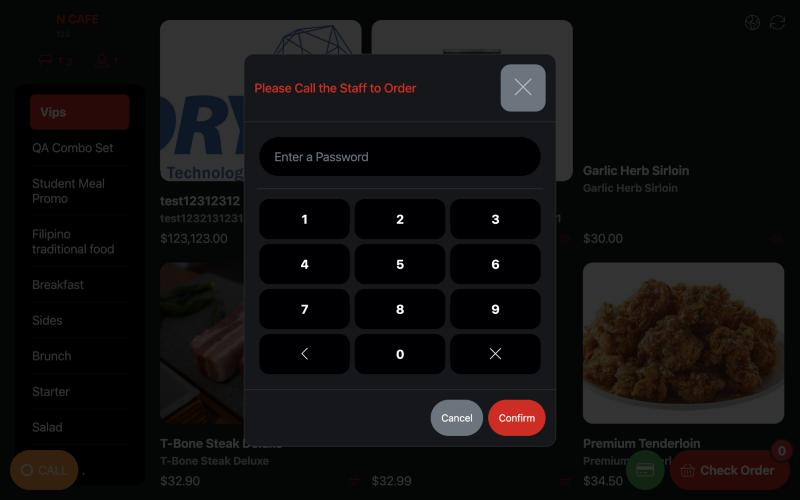
- 나중에 테이블을 바꾸려면 왼쪽 위 테이블 번호를 누릅니다. 주문접수 암호를 묻는 창이 뜨고, 맞게 넣으면 Change Table 화면으로 갑니다. 손님이 테이블을 바꾸지 못하게 암호를 꼭 정해 두세요.
- 테이블 지정은 태블릿 브라우저에 저장됩니다. 브라우저 데이터를 지우면 3번부터 다시 합니다.
- 브라우저를 전체화면(홈 화면에 추가 또는 키오스크 앱)으로 두고, 화면 꺼짐을 끕니다.
- Connect the tablet to the same store Wi-Fi as the POS.
- Open
http://<Server IP>/nmenu/in the tablet browser (e.g.http://192.168.1.110/nmenu/). The first load downloads the menu. - (Table mode) A tablet with no table assigned shows the Change Table screen (table layout) right after loading, without asking for a password. Tap the table this tablet will sit on.
- When “Do you want to order?” appears, the table is set. From then on guests pick the number of people (Pax) and tap Tap to order.
- Check that the store name and table number (e.g. T 3) show at the top left of the menu screen.
- To change the table later, tap the table number at the top left. A window asks for the Order Request Password; enter it to go to the Change Table screen. Always set this password so guests cannot change tables.
- The table assignment is saved in the tablet’s browser. Clearing browser data means starting again from step 3.
- Keep the browser full screen (add to home screen or use a kiosk app) and turn off screen sleep.
3. QR 매장 가이드 (N-QR / Online Ordering)
3. QR store guide (N-QR / Online Ordering)
QR 주문은 손님 휴대폰이 클라우드(Online Ordering)를 거쳐 POS 로 주문을 보냅니다. 그래서 POS 에 인터넷이 항상 연결돼 있어야 하고, N-QR 과 Online Ordering URL 이 둘 다 있어야 동작합니다.
With QR ordering, the guest’s phone sends the order to the POS through the cloud (Online Ordering). So the POS must always be online, and it works only when both N-QR and the Online Ordering URL are set.
3-1. 준비물 (본사에서 받을 것)
3-1. What you need (from head office)
- Online Ordering URL (매장별 QR 주문 주소)
- 상점코드(Store Code), Online Ordering STORE NO
- Online Ordering URL (the store’s QR ordering address)
- Store Code, Online Ordering STORE NO
3-2. QR 켜기 (Super Admin)
3-2. Turn on QR (Super Admin)
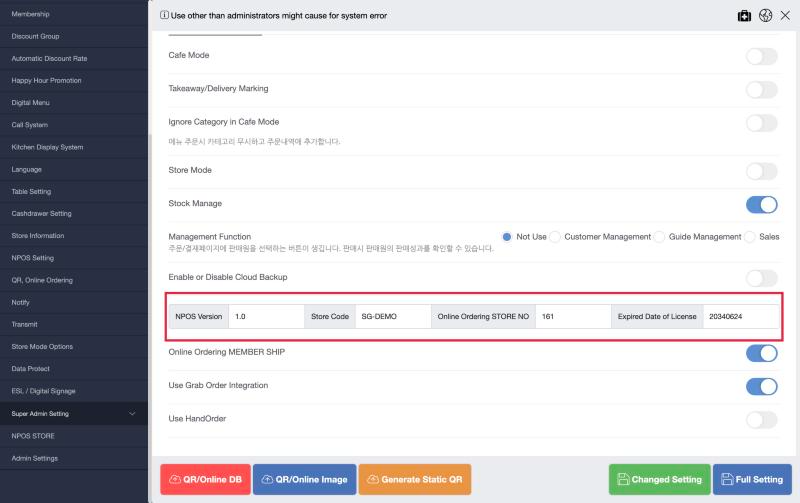
1단계. 1-1 대로 Super Admin 을 열고 Admin Settings 에서 Store Code 와 Online Ordering STORE NO 를 넣습니다.
Step 1. Open Super Admin as in 1-1 and enter Store Code and Online Ordering STORE NO in Admin Settings.
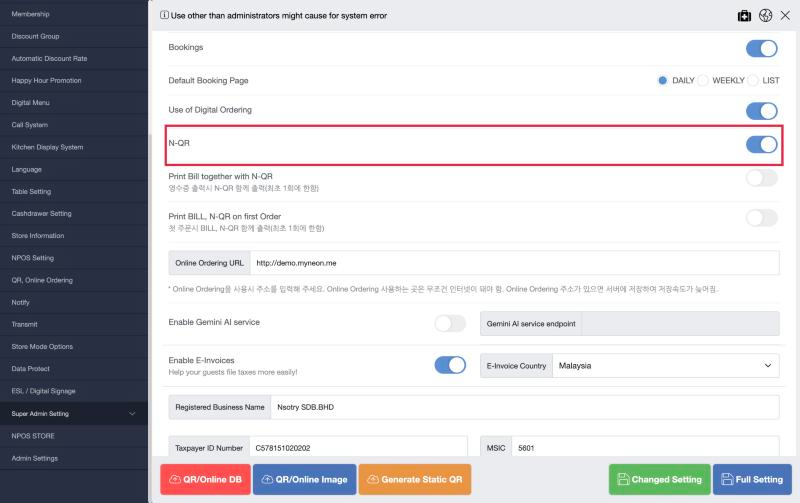
2단계. NPOS STORE 에서 N-QR 을 ON 합니다.
Step 2. Turn N-QR ON in NPOS STORE.
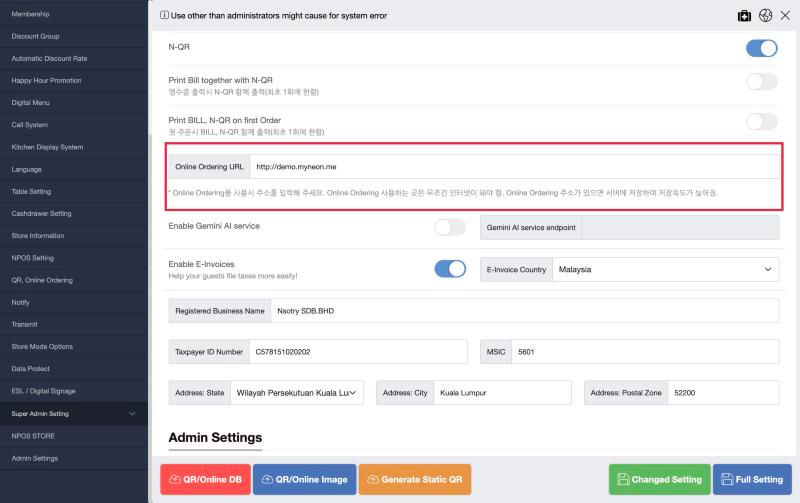
3단계. 바로 아래 Online Ordering URL 에 본사에서 받은 주소를 넣습니다.
Step 3. Enter the address from head office in Online Ordering URL just below.
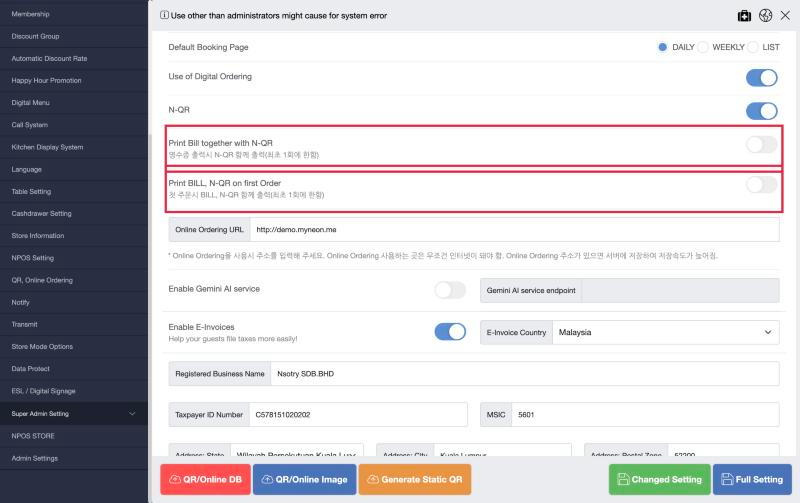
4단계. (선택) QR 종이를 프린터로 나눠주는 매장은 출력 옵션을 켭니다. Print Bill together with N-QR 은 빌 출력 때, Print BILL, N-QR on first Order 는 첫 주문 때 QR 을 함께 찍습니다. 둘 다 테이블당 최초 1회만 출력됩니다.
Step 4. (Optional) Stores that hand out printed QR slips turn on the print options. Print Bill together with N-QR prints the QR with the bill; Print BILL, N-QR on first Order prints it with the first order. Each prints only once per table.
5단계. Changed Setting 으로 저장하고 새로고침한 뒤, Super Admin 을 다시 엽니다. URL 이 저장돼 있어야 3-4 의 버튼 3개가 보입니다.
Step 5. Save with Changed Setting, refresh, and open Super Admin again. The three buttons in 3-4 appear only once the URL is saved.
6단계. 메뉴 이미지는 2-1 의 3단계와 같은 방법으로 올립니다.
Step 6. Upload menu images the same way as Step 3 of 2-1.
3-3. QR, Online Ordering 설정
3-3. QR, Online Ordering settings
왼쪽 메뉴 QR, Online Ordering 에서 설정합니다.
Set these under QR, Online Ordering in the left menu.
1단계. QR Type
Step 1. QR Type
| QR Type | 방식 | 어울리는 매장 |
|---|---|---|
| DYNAMIC QR | 주문·빌마다 새 QR 을 프린터로 출력 | 직원이 자리 안내 후 QR 종이를 주는 매장 |
| STATIC QR | 테이블마다 고정 QR 스티커 | 손님이 앉아서 바로 주문하는 매장 |
| QR Type | How it works | Best for |
|---|---|---|
| DYNAMIC QR | A new QR is printed for each order or bill | Stores where staff seat guests and hand them a QR slip |
| STATIC QR | A fixed QR sticker on each table | Stores where guests sit down and order rig |
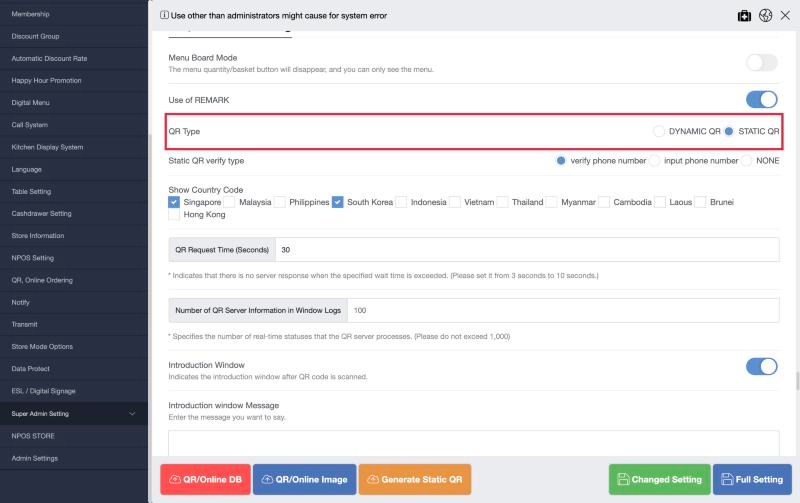
2단계. Static QR verify type, Show Country Code (STATIC 일 때만) — 스티커를 찍어 가서 매장 밖에서 주문하는 것을 막으려면 verify phone number 를 고릅니다. Show Country Code 에서 손님이 고를 국가번호를 체크하고, 매장 국가는 꼭 넣습니다.
Step 2. Static QR verify type, Show Country Code (STATIC only) — choose verify phone number to stop people from photographing the sticker and ordering from outside. In Show Country Code, tick the country codes guests can pick; always include the store’s country.
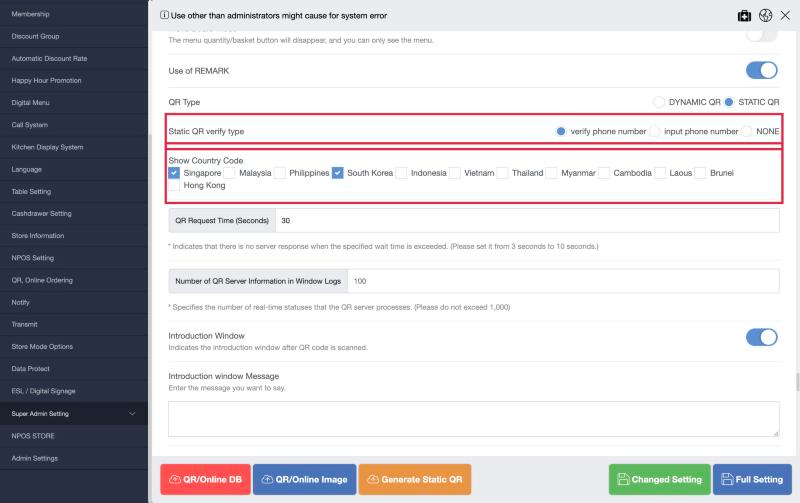
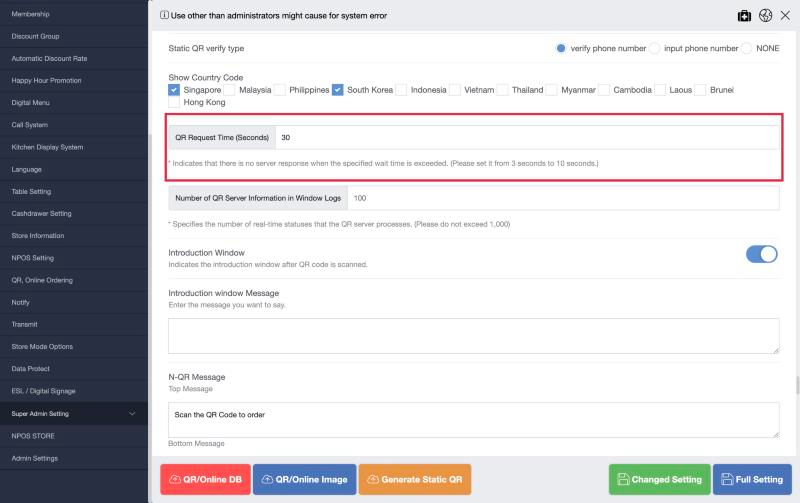
3단계. QR Request Time (Seconds) — 3~10초 사이로 넣습니다(권장 5). 넘으면 “서버 응답 없음” 안내가 뜹니다.
Step 3. QR Request Time (Seconds) — set 3 to 10 seconds (5 recommended). Past this, a “no server response” message appears.
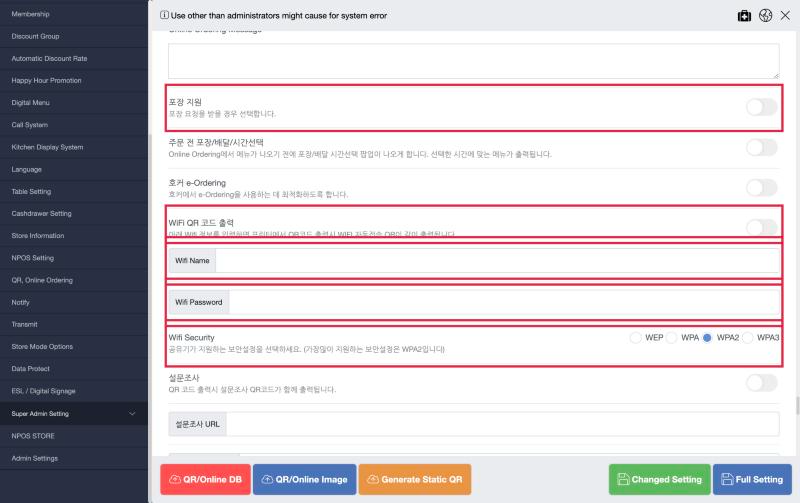
4단계. 포장 지원, WiFi QR 코드 출력 (선택) — QR 로 포장 주문을 받으면 포장 지원을 켭니다. 손님 Wi-Fi 를 제공하면 WiFi QR 코드 출력을 켜고 Wifi Name / Password / Security(보통 WPA2)를 넣습니다. QR 출력 때 자동 접속 QR 도 함께 찍힙니다.
Step 4. Takeaway support, WiFi QR code printing (optional) — turn on takeaway support to accept takeaway orders by QR. If the store offers guest Wi-Fi, turn on WiFi QR code printing and enter Wifi Name / Password / Security (usually WPA2); an auto-connect QR prints with the QR slip.
그 밖의 항목(Menu Board Mode, Introduction Window, N-QR Message 등)은 매장 요청이 있을 때만 설정합니다. Menu Board Mode 를 켜면 주문 없이 메뉴만 보이니 주의하세요.
Set other items (Menu Board Mode, Introduction Window, N-QR Message, etc.) only when the store asks. Menu Board Mode shows the menu without ordering, so be careful with it.
3-4. 메뉴·테이블 올리기
3-4. Uploading menus and tables
반드시 메뉴와 테이블 등록을 끝낸 뒤에 설정 화면 왼쪽 아래 버튼을 누릅니다.
Press the buttons at the bottom left of the settings screen only after menus and tables are fully registered.
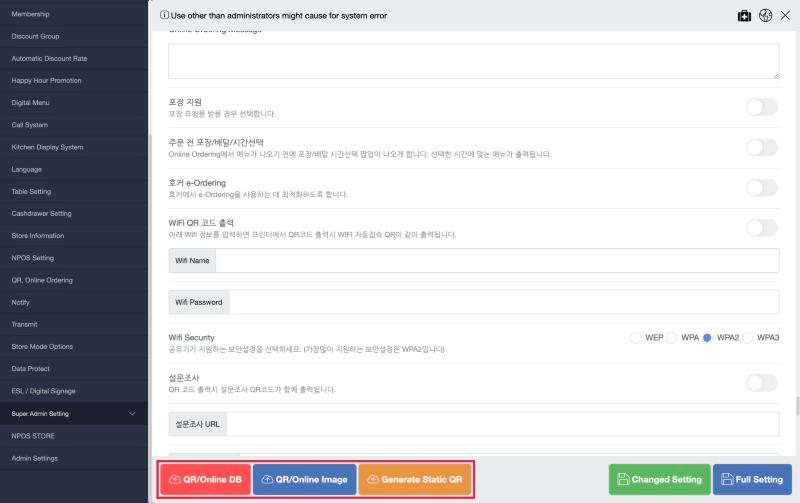
1단계. QR/Online DB(빨강) — POS 의 메뉴·설정을 클라우드로 올립니다. 메뉴를 바꿀 때마다 다시 눌러야 QR 메뉴에 반영됩니다.
Step 1. QR/Online DB (red) — uploads the POS menus and settings to the cloud. Press it again every time the menu changes, or the QR menu will not update.
2단계. QR/Online Image(파랑) — 메뉴 이미지를 올립니다.
Step 2. QR/Online Image (blue) — uploads the menu images.
3단계. Generate Static QR(주황, STATIC 만) — 등록된 모든 테이블의 QR 이미지를 POS PC 의 files/staticqr/ 폴더에 만듭니다. 파일 이름이 테이블 번호·이름이니 그대로 스티커로 인쇄합니다.
Step 3. Generate Static QR (orange, STATIC only) — creates QR images for every registered table in the POS PC’s files/staticqr/ folder. File names are the table number and name, so print them as stickers as-is.
테이블을 추가·삭제하거나 상점코드·URL 을 바꾸면 Static QR 을 다시 만들고 스티커도 다시 붙여야 합니다.
If you add or remove tables, or change the Store Code or URL, generate the Static QRs again and replace the stickers.
3-5. 운영 중 확인
3-5. Checking during operation
N-QR 을 켜면 테이블 화면 오른쪽에 QR 기록 아이콘이 생깁니다. 빨간 숫자가 보이면 처리 실패한 QR 주문이 있다는 뜻이니 눌러서 확인합니다.
With N-QR on, a QR history icon appears on the right of the table screen. A red number means some QR orders failed; tap it to check.